Posted on Fri, 05 Feb 2016
Hosting your web2py application - How and where?
You have just created your first web2py application and now you would like to show it to the world. You want to post it somewhere on the internet where anyone could reach it. Now, if you’ve tried Googling "web2py hosting", you might have noticed that you receive far less results than if you had searched for "php hosting" or something similar. This is because python hosting is still in its infancy and there are still only a dozen hosting providers. I will now show you how to host your web2py application through two of those providers. The first one, pythonanywhere, is a specialized PaaS (platform as a service) python hosting provider with some ready-made solutions for easy deployment. It is very simple to deploy your application through this provider, yet it also comes with a few limitations. The second one is an IaaS (infrastructure as a service) provider called DigitalOcean through which we will purchase a virtual server and install all of the necessary software for hosting your app. It doesn't have all of pythonanywhere's limitations but it will be a little bit more complicated to set up.
Putting your app on pythonanywhere
Probably the easiest provider to host your web app to is pythonanywhere.com. It specifically targets python and its related frameworks such as web2py, django and some others. In the official web2py reference manual, in the chapter titled "Deploying Recipes", there is a section on how to deploy your application on pythonanywhere.com. I will reiterate the steps here for reference:
- Create an account on pythonanywhere and log in (I presume that you would like a "Beginner" account at no monthly charge)
- Click on "Web"
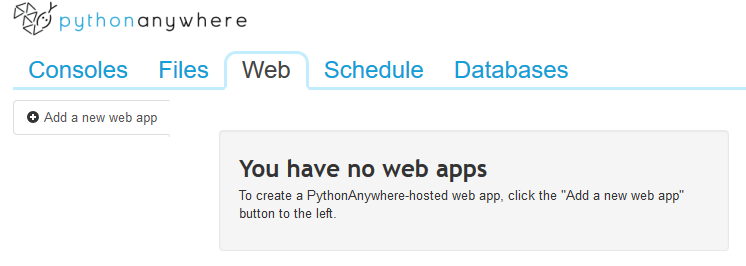
- Click on "Add a new web app"
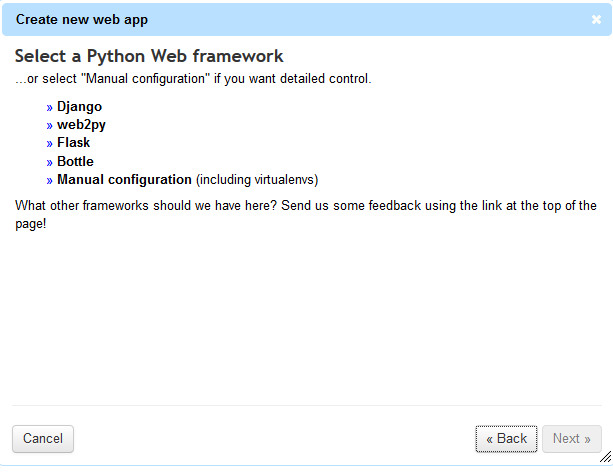
- Click "Next", then click on "web2py"
- Enter your admin password and click on "Next"
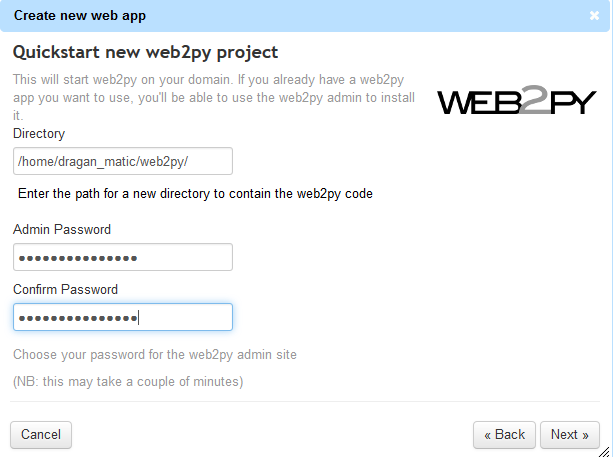
Your web2py environment is now set up and you can view it at "http://YOUR_USERNAME.pythonanywhere.com/welcome/default/index".
Next, you will need to upload your web app from your computer to pythonanywhere.com as follows:
-
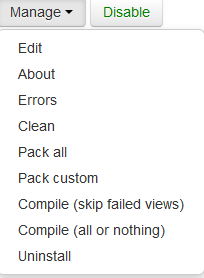
Go to your web2py dev machine (presumably at http://127.0.0.1:8000/admin/default/site) and select "Manage" and then "Pack all" on your application. Save it somewhere on disk.
-
In order to upload your app go to https://YOUR_USERNAME.pythonanywhere.com/admin (note the https://), login with your admin password
-
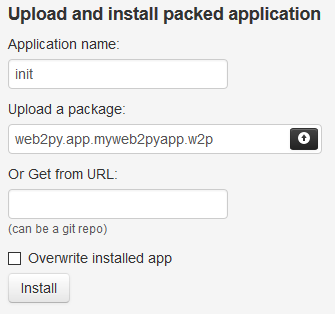
For "Upload and install packed application", "Application name", type "init".
-
For "Upload package", select the file that you saved in step 1.
-
You should now have your application at http://YOUR_USERNAME.pythonanywhere.com/
And that's it. Your application is live and accessible from the internet. If you want to use a database, you will need to enable mysql. Here's how to do it:
-
Click on "databases". At this point, you will only be able to choose mysql; for postgresql you will need to upgrade your plan.
-
Enter your mysql password (this will be the password that your application will use to connect to the database with).
-
You can now create your database. Enter its name in the field and click on "Create".
-
You should be able to see how to connect your application to your database in the "Connecting" section. It will show the database host address as well as your username. Once you change your db connection string in your application, it will start using the database.
Now, if you chose the free (beginner) plan, it will only allow enough processor time and disk space to put your application up mainly for demo purposes and to show it to your teachers and/or a few of your friends. In addition, you will not be able to register a domain name for your app and you will only be able to access it through http://YOUR_USERNAME.pythonanywhere.com/. In order for your app to be accessible through any DNS record that you registered (for example, www.myapplication.com), you will need to purchase—at the minimum—their "hacker" plan for $5/month. Since you’ve reached the point where you’ll have to pay, let's see what other options are available.
Running your web2py app on your own server.
As easy it was to set up an app on pythonanywhere, this option still has a few disadvantages. First of all, there’s the issue of disk space. If you choose the $5/month plan, you will only receive 2GB disk space which may be enough for your application, but if you plan to upload pictures using your app, it will soon not be enough. A second (and more important) issue, is the inability to run your application with a postgresql database (which is something I would highly advise to do), which means you're left with mysql only. A better solution (albeit, a little more complicated one) would be to rent your own virtual server from one of the cloud server providers (such as linode or digitalocean) and then install and set up your own web and database server. It may sound a little intimidating at first but this little tutorial will show you how to do it.
Setting up your web2py application on a DigitalOcean server
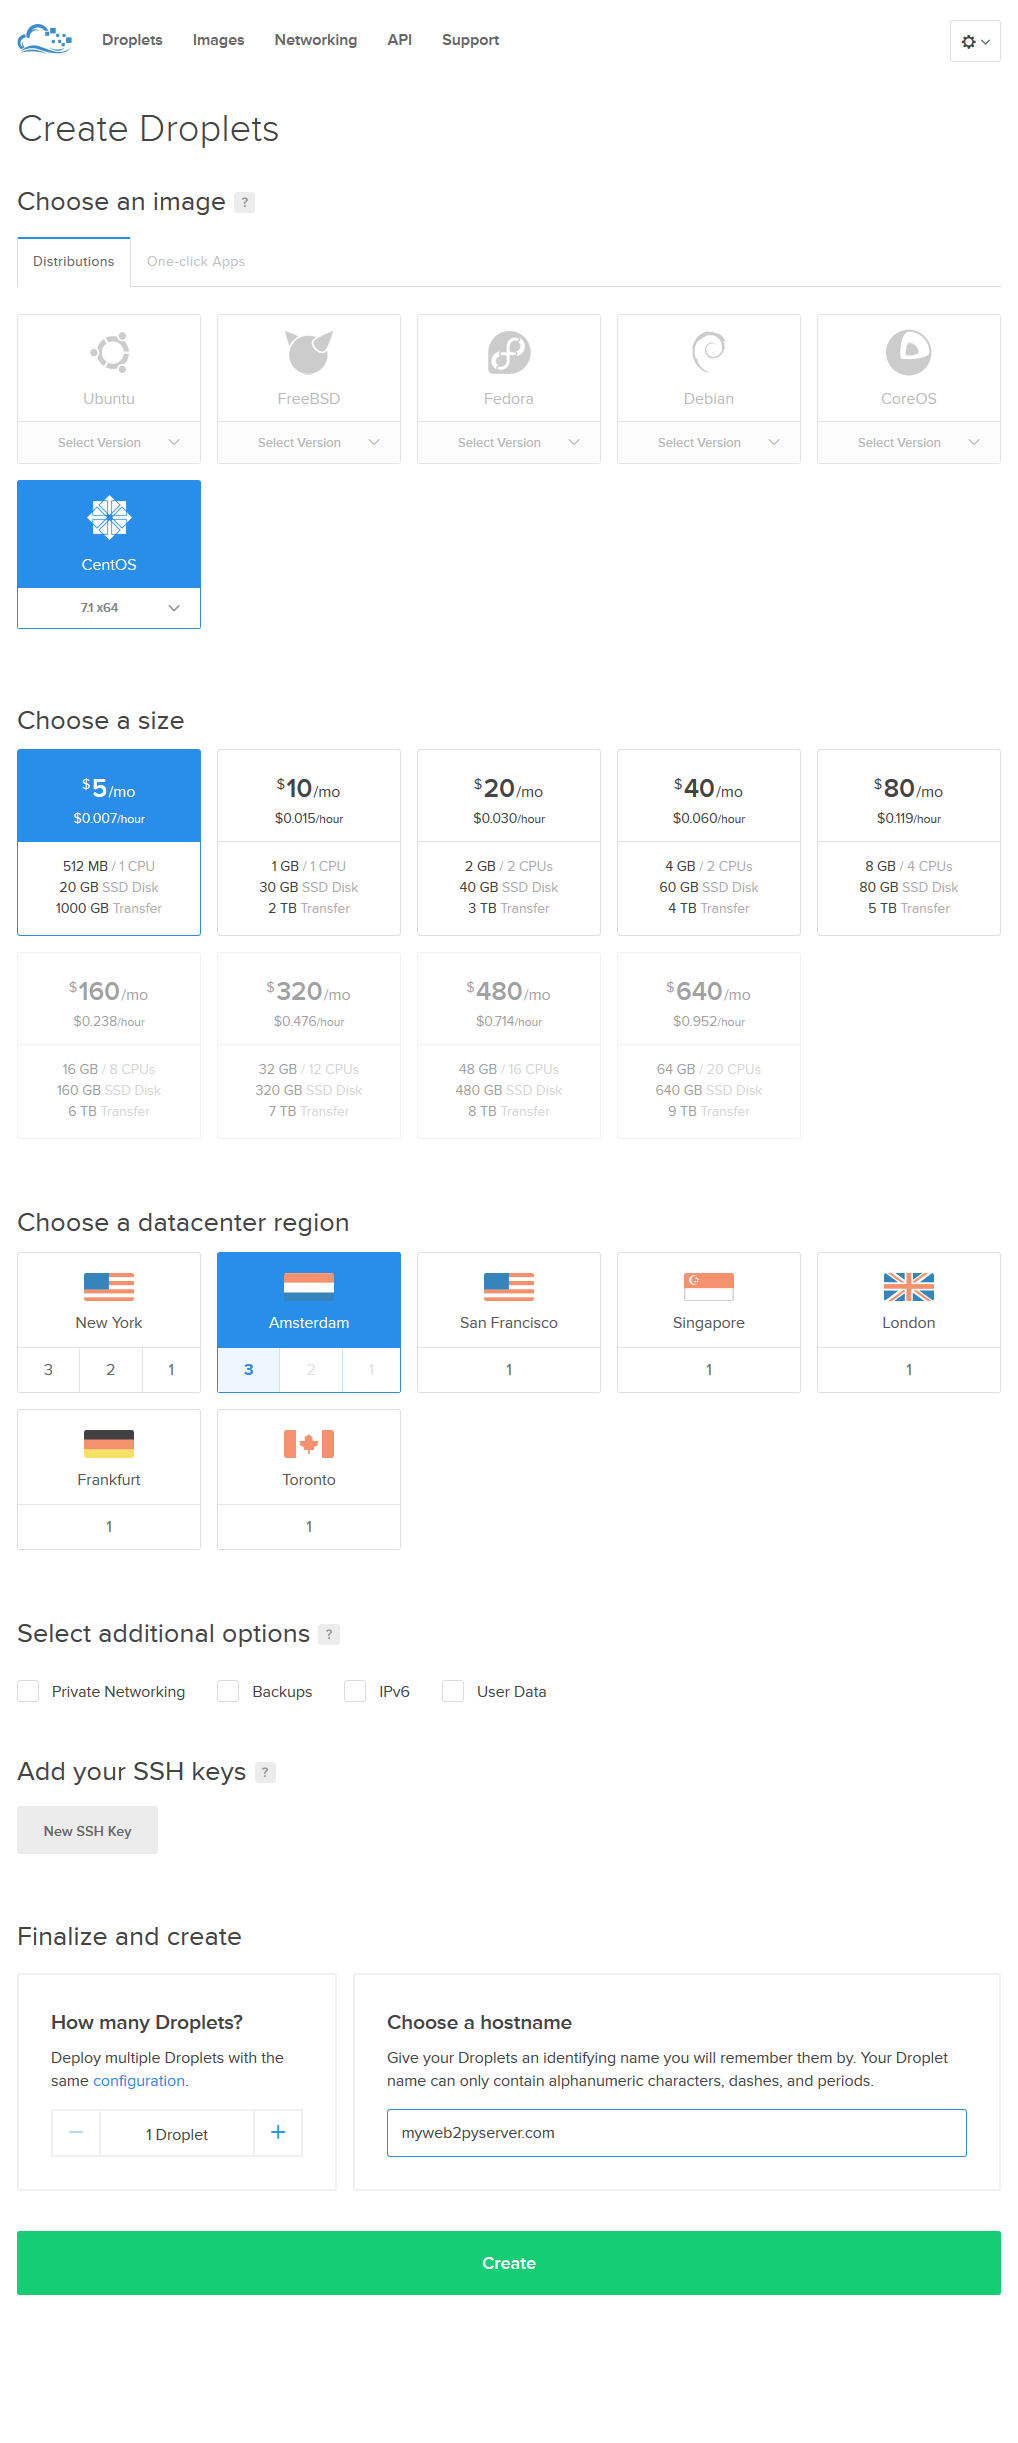
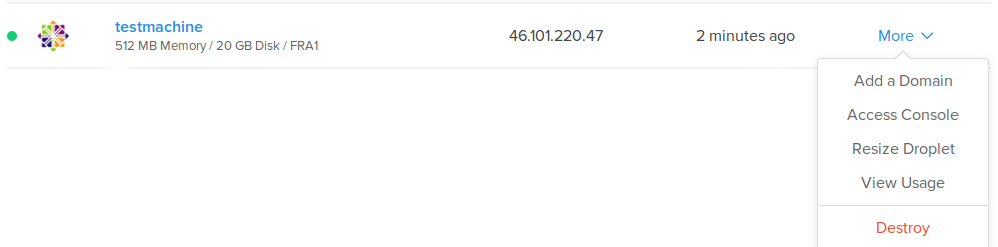
After you sign in and enter your billing details, click "Create Droplet". For "Choose an image", select “CentOS”. For “Choose a size”, select the smallest one. For “Choose a datacenter region”, select the one closest to you and then type in the hostname that you chose.
After you've pressed the "Create" button, you will receive your host's IP address and a root password. This means that your server is up and ready. You will now need to connect to it and set up a few things. If you are using a Windows system, you will need putty (you can download it here). Type in your server's IP address and click on "Open". If you are using Mac or Linux, go to the command line and type "ssh root@YOUR_SERVER_IP" and press “Enter”. For the username, type "root" and for the password, type the password you’ve received by email. The first time you log in, you will be asked to change your password.
Now that you’ve set your new root password, it’s time to bring the system up to date:
yum -y upgrade
pip install --upgrade pip
After that, you should start the firewall service. For now, accept its default parameters and plan on configuring it later.
systemctl enable firewalld
systemctl start firewalld
Registering your domain name
Before you proceed, you need to give your server a name. Currently, it is reachable only by its IP address which is okay if you are just testing your app, but you will probably want it to be reachable by its domain name. For that, you will need to buy your domain name from any domain name provider (google "domain name registration"). It will cost you around $10 per year. Once you've bought your domain name, be sure to set up domain servers with your provider. They should be set like this:
Name server 1: ns1.digitalocean.com
Name server 2: ns2.digitalocean.com
Name server 3: ns3.digitalocean.com
Now that you have your domain name set up, you need to register it on digitalocean's DNS servers. Open up your digitalocean droplets page and click on dns settings.
You should add your domain name and your droplet name like this:
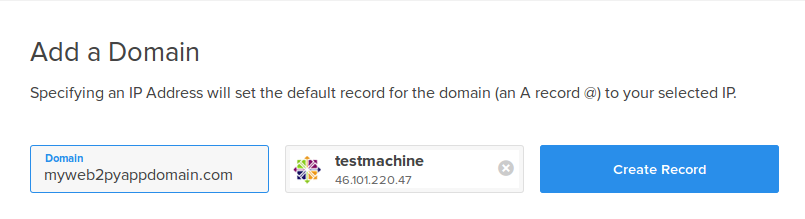
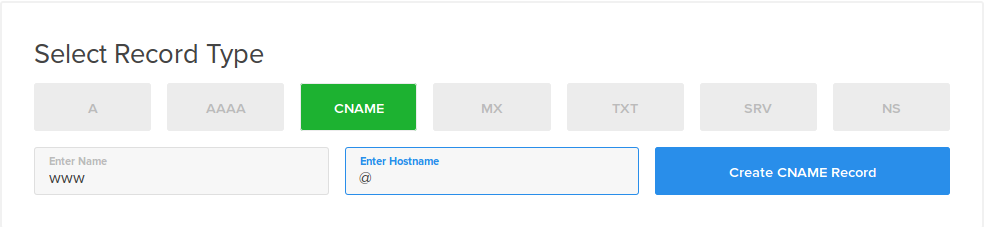
This has registered your domain name with your droplet (ex: mydomain.com). If you would like a domain prefix (for instance, www) to be registered with your droplet, you need to add a cname like this:
Now that your domain name is registered, you will probably not be able to see your server by its name immediately. In theory, it can take up to 24 hours for domain name registration to be visible everywhere on the internet. In reality, you will probably be able to access your droplet by its domain name in about half an hour or so.
Now that your domain is registered, you should log in to your server again and continue setting it up.
Setting up swap space
The next thing to do would be to set up swap space. If you’ve bought the smallest droplet (with 512MB of memory), setting up swap space on disk will speed up your server's response times because it acts as a virtual memory that the system can use when it is low on physical memory.
Swap space is, of course, using some of your system's disk space. So let's check how you stand in that regard:
df -h
You should see something like this:
Filesystem      Size  Used Avail Use% Mounted on
/dev/vda1        20G  2.0G   17G  11% /
devtmpfs        237M     0  237M   0% /dev
tmpfs           245M     0  245M   0% /dev/shm
tmpfs           245M   29M  217M  12% /run
tmpfs           245M     0  245M   0% /sys/fs/cgroup
tmpfs            49M     0   49M   0% /run/user/0
We can see that the system is using 2.0G or 11% of 20G hard disk and that we still have 17G available. We will use some of this space for our swap drive.
Create a file for the swap drive with the following command:
fallocate -l 2G /swapfile
Change its permissions so that only root can read and write it.
chmod 600 /swapfile
Now, tell the system to use this file as a swap space.
mkswap /swapfile
Setting up swapspace version 1, size = 2097148 KiB
no label, UUID=e64bf76a-2c9e-4fdb-818e-593d99a9195b
The swap file is now ready to be used as a swap space, so activate it:
swapon /swapfile
To verify that the procedure was successful, you can now check whether your system reports swap space:
swapon -s
Filename                                Type            Size    Used    Priority
/swapfile                               file    2097148 0       -1
Next, we want to make that change permanent so we'll edit the /etc/fstab file and add a line to it.
nano /etc/fstab
At the bottom of the file add the following line:
/swapfile swap swap sw 0 0
The swap file is now permanent. It is time to install web2py.
Installing web server and web2py framework
The next step is to download the script that will install the web2py framework. Use the script that installs nginx web server:
cd~
wget https://raw.githubusercontent.com/web2py/web2py/master/scripts/setup-web2py-nginx-uwsgi-centos7.sh
Change it to “executable”.
chmod +x setup-web2py-nginx-uwsgi-centos7.sh
And now you can start it.
./setup-web2py-nginx-uwsgi-centos7.sh
You will first be asked a few questions such as where to install it, what will your web2py admin password be and what will your domain name be.
Enter username under which web2py will be installed [web2py]:
Enter path where web2py will be installed [/opt/web2py_apps]:
Web2py subdirectory will be called: [web2py]:
Enter your web2py admin password: YOUR_WEB2PY_ADMIN_PASSWORD
Enter your domain name: YOUR_DOMAIN_NAME
When this script is finished, you will have web2py installed on your server. Before you use it, you’ll need to set up a few other things. First start with taking care of security.
Installing certificates from letsencrypt.org
If you want to access web2py's admin app, you can only do this using encrypted https protocol. In our previous step, web2py's install script has created some self-signed certificates. You may use them but every browser will report a warning because there is no chain of trust that is needed for https protocol's safe use. You will now replace them with proper certificates. For that, you can use the certificate authority named letsencrypt. Their aim is to provide free certificates through an automated process. The only drawback is that it uses port 80 for its work so if you have an http server active, you’ll have to stop it for now. Later, we’ll show how it can be automated without having to stop it.
For this example, I will assume that you do not have your http server active. Also, if your server has more than one cname, you will need to get certificates for each name. You can get certificates for each of your cnames (example.com, www.example.com) or you can have one certificate for all of your cnames. In this example I have asked for one certificate for multiple cnames; simply substitute “example.com” with your domain name.
cd ~
yum -y install git
git clone https://github.com/letsencrypt/letsencrypt
cd letsencrypt
At this step, it is important that you have port 80 open on your server, so if it is not already open, type the following:
firewall-cmd --add-port=80/tcp --permanent
firewall-cmd --reload
It is also important to have your DNS properly configured for all of the domains that you will be asking for certificates for. Hopefully, you have configured it during the previous step (registering your domain name).
First, stop the nginx web server.
systemctl stop nginx
And now you can get your certificates (remember to change “example.com” to your real domain name).
./letsencrypt-auto certonly --standalone -d example.com -d www.example.com -d webmail.example.com
This will install additional packages, if needed, first and configure a few things. Follow the instructions on the screen
Our certificates are now stored at /etc/letsencrypt/live/example.com. These certificates are valid for three months only, so before they expire you will have to request new ones periodically.
Now you will tell your web server to use those certificates. Edit /etc/nginx/nginx.conf
nano /etc/nginx/nginx.conf
Find the section named server { listen 443; and change it to look like this (replace “example.com” with your domain name):
 server {
        listen 443;
        server_name www.example.com;

        ssl on;
        ssl_certificate /etc/letsencrypt/live/example.com/fullchain.pem;
        ssl_certificate_key /etc/letsencrypt/live/example.com/privkey.pem;

        ssl_protocols TLSv1 TLSv1.1 TLSv1.2;

        ssl_ciphers 'ECDHE-RSA-AES128-GCM-SHA256:ECDHE-ECDSA-AES128-GCM-SHA256:ECDHE-RSA-AES256-GCM-SHA384:ECDHE-ECDSA-AES256-GCM-SHA384:DHE-RSA-AES128-GCM-SHA256:DHE-DSS-AES128-GCM-SHA256:kEDH+AESGCM:ECDHE-RSA-AES128-SHA256:ECDHE-ECDSA-AES128-SHA256:ECDHE-RSA-AES128-SHA:ECDHE-ECDSA-AES128-SHA:ECDHE-RSA-AES256-SHA384:ECDHE-ECDSA-AES256-SHA384:ECDHE-RSA-AES256-SHA:ECDHE-ECDSA-AES256-SHA:DHE-RSA-AES128-SHA256:DHE-RSA-AES128-SHA:DHE-DSS-AES128-SHA256:DHE-RSA-AES256-SHA256:DHE-DSS-AES256-SHA:DHE-RSA-AES256-SHA:AES128-GCM-SHA256:AES256-GCM-SHA384:AES128-SHA256:AES256-SHA256:AES128-SHA:AES256-SHA:AES:CAMELLIA:DES-CBC3-SHA:!aNULL:!eNULL:!EXPORT:!DES:!RC4:!MD5:!PSK:!aECDH:!EDH-DSS-DES-CBC3-SHA:!EDH-RSA-DES-CBC3-SHA:!KRB5-DES-CBC3-SHA';

        ssl_prefer_server_ciphers on;

        location / {
            include uwsgi_params;
            uwsgi_pass unix:/run/uwsgi/web2py.sock;
        }
You can now restart your web server:
systemctl start nginx
You should now try to access your server from the browser and if everything’s working so far, you should arrive at web2py's starting page. You should also try to access it with https protocol by typing https:// in front of your domain name. If your certificates are working, you should see a green lock in front of your address like this:

You can also test your certificate's strength here (again, replace “example.com” with your address).
https://www.ssllabs.com/ssltest/analyze.html?d=example.com&latest
With these settings (analyzing them might take a few minutes), you should at least get an A- which is a pretty good result. Your server is now firewalled and secured. But before you set up your web2py application, you should do one more important thing.
Securing your ssl login with ssh keys
If you try to log in to your server again with your root account, you will probably see something like this:
Last failed login: Mon Feb  1 05:14:25 EST 2016 from 135.132.15.226 on ssh:notty
There were 1344 failed login attempts since the last successful login.
Last login: Thu Jan 28 12:06:51 2016 from 75.125.11.153
You can see that there were probably hundreds (if not thousands) of failed login attempts. It means that there are people and automated scripts that are constantly trying to break in to your machine. They are trying to guess your password so in order to stop them you will now generate an SSH key and will tell the server to stop accepting keyless logins. First, generate a public-key, private-key pair. Your public key will be put on the server while your private key should be on your local machine and properly secured. Your private key will also be secured with a password and you will use it to log in to the server. The server will check to see if the provided private key matches the public one and if they match, you will be able to log in once you have provided the password for the keys. You can see that this provides extra security because now a password alone is not enough to log in to the server and if someone somehow manages to obtain your private key, he/she will still not be able to login without a password.
.
Now create a key pair on your local machine and transfer the public key to the server. If you use Linux or Mac, go to the terminal and type the following:
cd~
ssh-keygen -t rsa
Generating public/private rsa key pair.
Enter file in which to save the key (/root/.ssh/id_rsa):
Enter passphrase (empty for no passphrase):
Enter same passphrase again:
Your identification has been saved in /root/.ssh/id_rsa.
Your public key has been saved in /root/.ssh/id_rsa.pub.
The key fingerprint is:
14:b3:80:b4:5b:03:29:18:c6:b6:d4:30:12:5e:bc:47 root@centos-7-x64
The key's randomart image is:
+--[ RSA 2048]----+
|=B+ooo. o        |
|=++ooE . +       |
|o...+ o o        |
| . . + o         |
|    o   S        |
|                 |
|                 |
|                 |
|                 |
+-----------------+
Your private key has been saved as ~/.ssh/id_rsa while your public key has been saved as ~/ssh/id_rsa.pub.
If you have a Windows machine you can generate public/private key pairs using puttygen (which you can download here)
Now that you have your keys, you need to send your public key to the server. If you use Linux or Mac, type the following:
scp ~/.ssh/id_rsa.pub root@YOUR_SERVER_ADDRESS:/root/.ssh/authorized_keys
On a Windows machine, the easiest way to transfer files is to use WinScp. You should copy your public key to the /root/.scp directory (create it if it doesn't already exist), copy the file and rename it “authorized_keys”.
Now that you have your public key on the server, you need to give it proper permissions and instruct the ssh to not accept password-only logins.
Log in to the server and type the following:
cd ~/.ssh
chown 600 authorized_keys
Edit /etc/ssh/sshd_config
nano /etc/ssh/sshd_config
Find the following lines and change them as shown:
PasswordAuthentication no
ChallengeResponseAuthentication no
Restart the ssh server.
systemctl restart sshd
Now, if you try to log in to your server without the key, you should receive the following error:
Permission denied (publickey,gssapi-keyex,gssapi-with-mic).
From now on, if you are logging in from a Mac or Linux, you must supply the public key file as shown:
ssh -i PUBLIC_KEY_FILE root@YOUR_SERVER_ADDRESSS
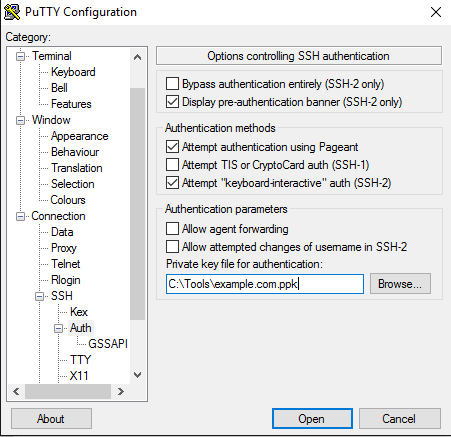
If you are using Windows, you need to tell putty to use the private key file. You can find it in the options tree on the left side in Connection/SSH/Auth; type in your private key file path as in the following picture:
Preparations are now over and your server is now secured. Now you can install your web2py app.
Setting up your web2py application
Start your local web2py dev server and pack your application by using "Pack All".
Go to https://www.YOUR_DOMAIN.com/admin and login to the web2py admin app (http://YOUR_DOMAIN/admin). You will need to enter the password that you set up when you installed web2py. Next, you will need to upload your packed web2py app. If you want it to be the default app, simply name it "init" like this:
After you press “install”, your web2py app should be ready. Reload your webpage and your application should respond. Remember to delete the "welcome" and "examples" apps that were installed as a part of web2py.
Installing Databases
Your application will probably need to communicate with a database. Configuring and optimizing databases is a completely different topic but for now, here are a few steps explaining how to install a database server.
Before we proceed any further, a word of caution: A database server, as any other program does, needs a certain amount of memory to work. This memory will now be shared between the database server, web server and your web2py application. If you purchased the smallest server (depending on your application), it will probably work for a few dozen hits per minute but for anything more than that you will likely need a stronger server. With that said, begin installing your database of choice.
Installing Postgresql
Type the following to install and initialize the postgresql server:
yum -y install postgresql postgresql-server
postgresql-initdb
systemctl start postgresql
systemctl enable postgresql
Now you will create a “web2py” user and a “web2pydb” database for your application.
su postgres
createuser web2py -P
Enter password for new role: YOUR_DATABASE_PASSWORD
Enter it again: YOUR_DATABASE_PASSWORD
createdb web2pydb -O web2py
exit
Now that a user has been created, you will tell the database how to authenticate it.
cd /var/lib/pgsql/data/
Edit pg_hba.conf and add the following at the end:
host web2pydb web2py 127.0.0.1/32 md5
You should now either restart the database to activate your changes like this:
systemctl restart postgresql
…or you can just signal it to re-read the configuration files.
su postgres
pg_ctl reload -D /var/lib/pgsql/data
exit
Either way, you can now connect to the postgresql server from your web2py application with the following command:
db = DAL('postgres://web2py:YOUR_DATABASE_PASSWORD@localhost/web2pydb')
Installing MySql
Type the following to install mysql server:
yum -y install mariadb-server
systemctl start mariadb
systemctl enable mariadb
Now you will create a “web2py” user and a “web2pydb” database for your application.
mysql
create database web2pydb
CREATE USER 'web2py' IDENTIFIED BY 'password';
GRANT ALL PRIVILEGES ON web2pydb . * TO 'web2py';
quit
You have now created a username and database for your application. Security should also be reinforced, which includes removing default and sample databases and adding a password for the root user. To do that, type the following and accept the default values:
mysql_secure_installation
You will now be able to connect to your mysql database from your web2py application using the following command:
db = DAL(mysql://web2py:password@localhost/web2pydb)